Showing posts with label iPhone. Show all posts

Tuesday, 25 September 2012

Add NavigationBar on PresentModalViewController

UIViewController = YOUR_VIEW_CONTROLLER;
 UIViewController *viewController=[[UIViewController alloc]initWithNibName:@"UIViewController" bundle:nil];
UINavigationController *navBarController=[[UINavigationController alloc]initWithRootViewController: viewController];
[self.navigationController presentModalViewController:navBarController animated:YES];
[navBarController release];
[UIViewController release];
if you want to add barbutton-items on this navBarController :
self.navigationItem.leftBarButtonItem = [[[UIBarButtonItem alloc] initWithBarButtonSystemItem:YOUR_BAR_SYSTEM_ITEM target:self action:@selector(YOUR_SELECTOR:)] autorelease];
self.navigationItem.rightBarButtonItem = [[[UIBarButtonItem alloc] initWithBarButtonSystemItem:YOUR_BAR_SYSTEM_ITEM target:self action:@selector(YOUR_SELECTOR:)] autorelease];

Thursday, 26 April 2012

Navigation - bar set background image for both ios5 & ios 4

In ios > 5 API updated with barMetrics arguments to setbackgroundimage for UInavigationbar and in ios < 5 only & only option to set background-image on navigationbar by calling drawRect () function  but it didn't work for me , resulting some errors on this.After being a lot of search on this but i'm totally failed.So,I did some trick on this and it works for me.

if ([self.navigationController.navigationBar respondsToSelector:@selector(setBackgroundImage:forBarMetrics:)] ) {
For ios 5 or above

[self.navigationController.navigationBar setBackgroundImage:[UIImage imageNamed:@"YOUR_IMAGE_NAME_WITH_EXTENSION"] forBarMetrics:UIBarMetricsDefault];
}
else {

 For ios 4 or less 

NSString *barBgPath = [[NSBundle mainBundle] pathForResource:@"YOUR_IMAGE_NAME" ofType:@"YOUR_IMAGE_EXTENSION"];

[self.navigationController.navigationBar.layer setContents:(id)[UIImage imageWithContentsOfFile: barBgPath].CGImage];

self.navigationController.navigationBar.alpha=1.0; //If you want change alpha

}

Cheers:)
Enjoyyyyyy!

Tuesday, 24 April 2012

iPhone | UIButton set title label, font, alignment

     
UIButton *yourButton = [UIButtonbuttonWithType:UIButtonTypeCustom];
yourButton.frame=CGRectMake(X_ORIGIN,Y_ORIGIN,WIDTH,HEIGHT);
// Here, yourButton.titleLabel.text = @"YOUR_TEXT"; // doesn't do the trick :(
[yourButton setTitle:@"YOUR_TEXT" forState:UIControlStateNormal];
[yourButton addTarget:self action:@selector(YOUR_SELECTOR) forControlEvents:UIControlEventTouchUpInside];
[self.view addSubview: yourButton];

However, I'm not sure why yourButton.titleLabel.text = @"YOUR_TEXT";  doesn't work
[yourButton setTitle:@"YOUR_TEXT" forState:UIControlStateNormal]; did the trick though!

if you change the font of this title :
yourButton.titleLabel.font = YOUR_FONT_VALUE;

if you change the alignment-left of UIButton :
yourButton.contentHorizontalAlignment = UIControlContentHorizontalAlignmentLeft;
adjustment of content left inset , otherwise text will touch the left border.
yourButton.contentEdgeInsets = UIEdgeInsetsMake(0,10,0,0);

Note: Check out UIControl API docs.

Hope it makes life easier!

Friday, 17 February 2012

Port an iPhone Application to the iPad

The app we’ll be porting is a simple app called “PortMe” that contains some of the elements found in many iPhone apps – table views, standard view controllers, and editing capability.

You’ll see that there are three view controllers. The first is a table view of the list of My Friends. The second is a view controller with a XIB to show the details of friend. The third is a table view that lets the user rate to his friend.
Look over the app and make sure you’re familiar with the structure. Once you’re done – let’s get to porting!

Upgrade Target for iPad

The initial step to port an iPhone to the iPad is almost misleadingly easy. Simply expand Targets and select “PortMe”, then click “Project\Upgrade Current Target for iPad”.


You have two options here – one universal application, or two device-specific applications. If you choose “One universal application”, that will allow you to make an app that customers can buy once, and have it work on both the iPhone or the iPad. If you want customers to purchase them separately, you may wish to choose “Two device-specific applications.”
In our case we’re going to make a Universal application, so click that and click OK.
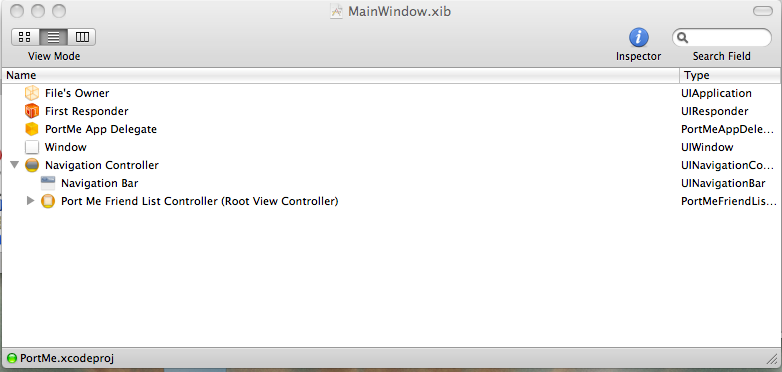
Let’s take a look at what this did for us. The first thing it did was to create a new file called “MainWindow-iPad.xib” inside the “Resources-iPad” folder.
If you open it up and double click the Window, you’ll notice a big iPad sized Window. The XIB also contains the objects that were in the old XIB – the navigation controller with the PortMeFriendListController set as the root view controller.


Another thing this did was to set our project to link against the 3.2 SDK. You’ll notice that compiling for the 3.2 SDK isn’t even an option anymore (at least once you switch off of the old SDK for the first time):

We can see this in the Target Info as well; it changed the Base SDK to “iPhone Device 3.2″ and the Targeted Device Family to iPhone/iPad:


Autosizing

When I set up the sample project, I just dragged over several UI elements into the view, and paid no attention whatsoever to the autosizing attributes – as could be a common case when an iPhone app is made without rotation support.
But now that we want our app to support both the small and big screen as well as (eventually) be able to support rotation, autosizing becomes very important. With autosizing, we can tell each UI element how it should react when the size of its parent view changes.
The easiest way to see this working is by trying it out ourselves! Open up PortMeGameDetailsController.xib, and double click the view.
For the top label (friend name), we want the labels grow in width as the view grows in width. So select those two labels and go to the third tab in the inspector. Down in the Autosizing section, set click on the light red areas until you get it looking like the following:


Set the UIImageView like the following:

This means that the UIImageView should grow in both width AND height as the view expands, and stay anchored to the edges of the view.


Definitely an improvement!

However there’s one major problem: if you try to rotate the simulator with “Hardware\Rotate Left” – the iPad rotates but the app doesn’t! And since supporting all orientations is a requirement for iPad apps, that would mean instant rejection at this point.
Luckily, since we’ve set our autosizing attributes correctly for our view (and since UITableViewController already supports rotation), we can fix with just a couple lines of code.


Add the following code to the end of PortMeFriendListController.m, PortMeFriendDetailsController.m, and PortMeFriendRatingController.m:

- (BOOL)shouldAutorotateToInterfaceOrientation:
(UIInterfaceOrientation)toInterfaceOrientation {
return YES;
}

Compile and run the app, and now you should be able to rotate the phone to any direction and have the elements move correctly:

UISplitViewController Integration


UISplitViewControllers are designed so that you navigate to an item on the left hand side, and then see the details of the item on the right hand side.
This would be perfect for our app! We can put the list of friends on the left, and put the friend details on the right.
So let’s go ahead and integrate a UISplitViewController into our project. Open up MainWindow-iPad.xib, and drag a Split View Controller into the window, and delete the old Navigation Controller.
Expand the Split View Controller tree until you find the Table View Controller. In the Inspector, go to the fourth tab and set the Class to PortMeFriendListController.
Now we have to set up the right hand side. Let’s think about this a minute. When the user taps “Rate This”, we currently push another view controller onto the stack. This means that we need the right side view controller also to be a UINavigationController (at least for now until we change that).
So drag a Navigation Controller on top of the View Controller for the right hand side, dig down and set the root view controller to “PortMeFriendDetailsController.” When you’re done it should look like this:


Ok now we need to hook this up to the code. Currently, the Application Delegate is set up to add the navController property as a subview to the main window. However, for the iPad, we want it to add the split view controller to the window instead.
This means that we need an outlet for the split view controller. We might be tempted to just declare it as normal – however keep in mind this app needs to work on both the iPhone (running iPhone OS 3.0-3.1.3) and the iPad (running iPhone OS 3.2). iPhone OS 3.2 is iPad only btw.

Open up PortMeAppDelegate.h and add the following code:

// In the class interface

id _splitViewController;

// Afterwards
@property (nonatomic, retain) IBOutlet id splitViewController;


Then add the following to PortMeAppDelegate.m:

// In synthesize section
@synthesize splitViewController = _splitViewController;

// In didFinishLaunchingWithOptions, replace window addSubview line with:
if (UI_USER_INTERFACE_IDIOM() == UIUserInterfaceIdiomPad) {
UIView *view = [_splitViewController view];
[window addSubview:view];
} else {
[window addSubview:_navController.view];
}

// In dealloc
self.splitViewController = nil;


The first line is the test you can use to see if your code is running on the iPad or not. If it is running on the iPad, we want to add the split view controller’s view as a subview of our window.

Since we have stored the split view as a generic object (rather than as the UISplitViewController class), we need to get the view by sending a message to it (rather than using dot notation).

That’s it for code! Last thing is to go back to MainWindow-iPad.xib and Control-drag from “Port Me App Delegate” to the “Split View Controller” and connect it to the “splitViewController” outlet, and Control-drag from “Port Me App Delegate” to the “Port Me Friend List Controller” and connect it to the “friendListController” outlet.

Make sure you save the XIB, then compile and run the app, and switch to landscape mode. The list of friends shows up OK on the left, but when you tap a friend it shows up in the same navigation controller instead of on the right hand side:


So let’s fix that next!

Linking up the Detail View

There are many good ways to hook the left and the right sides of a split view together, but one approach that works particularly well is delegation.
So we’ll follow the same approach we did in that tutorial and set up a protocol for “friend selected” that the detail view will implemenet to refresh the view.
Actually, this is a good point where you can practice doing this on your own and make sure you remember how to do it. If you successfully implement it on your own, just skip to the next section. Otherwise, you can keep following along!
If you choose to continue following along, go to File\New, choose Objective-C class, make sure “Subclass of” is “NSObject”, and click “Next”. Name the file “FriendSelectionDelegate” and click “Finish”.
Replace FriendSelectionDelegate.h with the following:


#import

@class Friends;

@protocol FriendSelectionDelegate
- (void)friendSelectionChanged:(Friends *)curSelection;
@end
Then delete FriendSelectionDelegate.m, since we don’t need it for a protocol.
Now, let’s modify the PortMeFriendListController to take a FriendSelectionDelegate. And add the following to PortMeFriendListController.h:
// At top, under #import
#import "FriendSelectionDelegate.h"

// Inside LeftViewController
id _delegate;

// Under @property
@property (nonatomic, assign) IBOutlet id delegate;
And add the following to PortMeFriendListController.h:
// Under @implementation
@synthesize delegate = _delegate;

// Inside didSelectRowAtIndexPath, replace navigation push line with:
if (UI_USER_INTERFACE_IDIOM() == UIUserInterfaceIdiomPad) {
if (_delegate != nil) {
[_delegate friendSelectionChanged:friend];
}
} else {
[self.navigationController pushViewController:_detailsController animated:YES];
}

// Inside dealloc
self.delegate = nil;

Then, we’ll modify PortMeFriendDetailsController to implement the delegate. Make the following changes to PortMeFriendDetailsController.h:

// At top, under #import
#import "FriendSelectionDelegate.h"

// Class declaration line
@interface PortMeFriendDetailsController : UIViewController {
Then add the following to PortMeFriendDetailsController.m:
// Replace viewWillAppear with the following:
- (void)refresh {
_nameLabel.text = _friend.name;
_descrView.text = _friend.descr;
_ratingLabel.text = [NSString
stringWithFormat:@"Your rating: %@", _friend.rating];
}

- (void) viewWillAppear:(BOOL)animated {
[self refresh];
}

- (void)friendSelectionChanged:(Friends *)curSelection {
self.friend = curSelection;
[self refresh];
}


And for the final step, we can actually connect the delegate using Interface Builder since we marked the delegate as an IBOutlet. Open up MainWindow-iPad.xib and Control-drag from “Port Me Friend List Controller” to “Port Me Friend Details Controller” and connect it to the delegate outlet.
That’s it! Compile and run the app, and you now should be able to select between the Friend like the following:


Adding a Popover List

It’s standard practice to have a way to bring up the left hand side when you’re in portrait mode by tapping a button in the toolbar.
There are a few changes due to this being a Universal app, and since the right side is a navigation controller rather than a view with a toolbar, so you may want to keep following along here.
Make the following changes to PortMeFriendDetailsController.h:

// Add UISplitViewControllerDelegate to the list of protocols
@interface PortMeFriendDetailsController : UIViewController
{

// Inside the class definition
id _popover;

// In the property section
@property (nonatomic, retain) id popover;
we declare the UIPopoverController as a generic object to avoid problems on the 3.0-3.1.3 OS.
Then add the following to PortMeFriendDetailsController.m:
// In synthesize section
@synthesize popover = _popover;

// In dealloc and viewDidUnload
self.popover = nil;

// In gameSelectionChanged
if (_popover != nil) {
[_popover dismissPopoverAnimated:YES];
}

// New functions
- (void)splitViewController: (UISplitViewController*)svc
willHideViewController:(UIViewController *)aViewController
withBarButtonItem:(UIBarButtonItem*)barButtonItem
forPopoverController: (UIPopoverController*)pc {
barButtonItem.title = @"Sidebar";

UINavigationItem *navItem = [self navigationItem];
[navItem setLeftBarButtonItem:barButtonItem animated:YES];

self.popover = pc;
}

- (void)splitViewController: (UISplitViewController*)svc
willShowViewController:(UIViewController *)aViewController
invalidatingBarButtonItem:(UIBarButtonItem *)barButtonItem {

UINavigationItem *navItem = [self navigationItem];
[navItem setLeftBarButtonItem:nil animated:YES];

self.popover = nil;

}
Then add the following to PortMeFriendListController.m to make the popover be a bit smaller rather than the full height of the screen:
// In viewDidLoad
if (UI_USER_INTERFACE_IDIOM() == UIUserInterfaceIdiomPad) {
[self setContentSizeForViewInPopover:CGSizeMake(320.0, 300.0)];
}

Note we have to be careful to only run this if we’re on the iPad (and use message passing rather than dot notation) since we may be running on the 3.0 OS.
One last thing – go back to MainWindow-iPad.xib and control-drag from “Split View Controller” to “Port Me Friend Details Controller” to set the right view controller as the delegate of the split view controller.
Compile and run the app, and if all goes well you should have an item on your nav controller bar that you can tap to bring up the list of Friends!


Using UIPopoverController

PopOverController is implemented on Rate button.

Add the following to PortMeFriendDetailsController.h:

// Inside class declaration
id _ratingPopover;

// In property section
@property (nonatomic, retain) id ratingPopover;
Again note the use of the generic objects here since this is a Universal app.
And the following to PortMeFriendDetailsController.m:
// In synthesize section
@synthesize ratingPopover = _ratingPopover;

// In dealloc AND viewDidUnload
self.ratingPopover = nil;

// In rateTapped, replace pushViewController with the following:
if (UI_USER_INTERFACE_IDIOM() == UIUserInterfaceIdiomPad) {
UIButton *button = (UIButton *)sender;
if (_ratingPopover == nil) {
Class classPopoverController = NSClassFromString(@"UIPopoverController");
if (classPopoverController) {
self.ratingPopover = [[[classPopoverController alloc]
initWithContentViewController:_ratingController] autorelease];
}
}
[_ratingPopover presentPopoverFromRect:button.frame inView:self.view
permittedArrowDirections:UIPopoverArrowDirectionAny animated:YES];
} else {
[self.navigationController pushViewController:_ratingController animated:YES];
}


Here we again switch based on whether we’re running on the iPad or not, and either present a popover or push onto the navigation controller as usual.

Next switch over to PortMeFriendRatingController.m and add the following:

if (UI_USER_INTERFACE_IDIOM() == UIUserInterfaceIdiomPad) {
[self setContentSizeForViewInPopover:CGSizeMake(320.0, 300.0)];
}

Compile and run the app, and if you select a friend and tap rate you should see the following:


Getting a Better Detail View

Better detail view could still use some work.
First, the image in the background was actually made for the iPhone, and is just being scaled to the larger screen. So it looks a bit grainy at the larger resolution.
Secondly, we could make better use of the increased screen real estate by making some of the text bigger, or moving around some of the labels to make better use of the space.
When you start to get a lot of changes you’d like to make to the view like this, you COULD do everything programatically by modifying the UI elements in code and switching on the UI_USER_INTERFACE_IDIOM(), but it’s often easier to just make a custom view XIB for the iPad.
So let’s give that a shot! Open up PortMeFriendDetailsController.xib, and click “File\Create iPad Version Using Autosizing Masks”. It will create an Untitled XIB – save the XIB in the project folder and name it “PortMeFriendDetailsController-iPad.xib”.
Then download a copy of a higher resolution background image and set the UIImageView’s image to “bg-iPad.jpg”. (Image credit: szajmon).
Save the XIB. The last step is to make sure that the iPad XIB is the one that is loaded. Open up MainWindow-iPad.xib, select the “Port Me Friend Details Controller”, and go to the first tab of the Inspector. Set the NIB name to “PortMeFriendDetailsController-iPad.xib”.
Save the XIB, compile and run the project. If all goes well you should see the new view like the following:


Cheers :))) Enjoy!

Friday, 20 January 2012

Radio Button in iPhone

Create Two Radio buttons with toggle action.


#define k1Tag 111
#define k2Tag 222


UIbutton *radioBtn1 = [UIButton buttonWithType:UIButtonTypeCustom];
radioBtn1=k1Tag;
[radioBtn1 setImage:[UIImage imageNamed:@"radio-off.png"] forState:UIControlStateNormal];
[radioBtn1 setImage:[UIImage imageNamed:@"radio-on.png"] forState:UIControlStateSelected];
[radioBtn1 setFrame:YOUR_FRAME];
radioBtn1.selected=YES;

[radioBtn1 addTarget:self action:@selector(checkboxButton:) forControlEvents:UIControlEventTouchUpInside];
[self.view addSubview:radioBtn1];
UIButton *radioBtn2 = [UIButton buttonWithType:UIButtonTypeCustom];
radioBtn2.tag=k2Tag;
[radioBtn2 setImage:[UIImage imageNamed:@"radio-off.png"] forState:UIControlStateNormal];
[radioBtn2 setImage:[UIImage imageNamed:@"radio-on.png"] forState:UIControlStateSelected];
[radioBtn2 setFrame:YOUR_FRAME];
[radioBtn2 addTarget:self action:@selector(checkboxButton:) forControlEvents:UIControlEventTouchUpInside];
[self.view addSubview:radioBtn2];


//SELECTOR_ON_RADIO_BUTTONS

- (IBAction)checkboxButton:(UIButton *)button{
int tag = button.tag;
for (UIButton *radioBtn in [self.view subviews]) {
if ([radioBtn isKindOfClass:[UIButton class]] && ![radioBtn isEqual:button]) {
[radioBtn setSelected:NO];
}
}
if (!button.selected) {
button.selected = !button.selected;
}
if (tag == k1Tag) {
NSLog(@"YOUR_CODE_HERE_FOR_TAG_1");
}else if (tag == k2Tag) {
NSLog(@"YOUR_CODE_HERE_FOR_TAG_2");
}
}

Friday, 6 January 2012

Creating PDF and attached with email in iphone | Objective C


I'm making an application which requires following requirements.
Steps:

1) Capturing a photo from iPhone Camera.
2) Creating PDF.
3) Saving photo in iPhone Library.
4) Email Attachment with PDF.


In .h file


#import <MessageUI/MessageUI.h>
#import <MessageUI/MFMailComposeViewController.h>

Protocols Used 
<MFMailComposeViewControllerDelegate,UIImagePickerControllerDelegate,UINavigationControllerDelegate>

NSString *imagePathString;
IBOutlet UIImageView *imgView;

@property (nonatomic,retain) NSString *imagePathString;
@property (nonatomic,retain) UIImageView *imgView;

-(IBAction) scanningPrescription : (id) sender;
-(IBAction) emailToPharmacist : (id) sender;

//EMAIL_FUNCTIONS
-(void)showPicker;
-(void)displayComposerSheet ;
-(void)launchMailAppOnDevice;


In .m file
#import <QuartzCore/QuartzCore.h>

@synthesize imagePathString,imgView;

- (void)viewDidLoad {

    self.imagePathString = [[NSString alloc]init];
    [super viewDidLoad];
}
-(IBAction) capturingPhoto : (id) sender{

if ([UIImagePickerController isSourceTypeAvailable:UIImagePickerControllerSourceTypeCamera]) {
// If camera is available

UIImagePickerController * imagePicker = [[UIImagePickerController alloc] init];
imagePicker.sourceType = UIImagePickerControllerSourceTypeCamera;
imagePicker.delegate = self;
[self presentModalViewController:imagePicker animated:YES];

}else {
// Camera is not available

UIAlertView *alertMsg = [[UIAlertView alloc] initWithTitle:nil message:@"Functionality is only available on devices with cameras." delegate:nil cancelButtonTitle:@"OK" otherButtonTitles:nil];
[alertMsg show];
[alertMsg release];


}


}

/*----------------------------DELEGATES_METHOD_FOR_CAMERA-----------------------*/

//CANCEL_CAPTURING
- (void)imagePickerControllerDidCancel:(UIImagePickerController *)picker {

    [self dismissModalViewControllerAnimated:YES];
}

//FINISH_CAPTURING_AN_IMAGE

- (void)imagePickerController:(UIImagePickerController *)picker didFinishPickingMediaWithInfo:(NSDictionary *)info {

NSLog(@"INFO_DESCRIPTion %@",[info description]);

UIImage * image = [info objectForKey:@"UIImagePickerControllerOriginalImage"];

// You have the image. You can use this to present the image in the next view like you require in #3.
//  Access the uncropped image from info dictionary

// SAVE_IMAGE
UIImageWriteToSavedPhotosAlbum(image, self, @selector(image:didFinishSavingWithError:contextInfo:), nil);

[picker release];
[self dismissModalViewControllerAnimated:YES];

}

//SAVE_IMAGE

- (void)image:(UIImage *)image didFinishSavingWithError:(NSError *)error contextInfo:(void *)contextInfo
{

// Unable to save the image
if (error){
UIAlertView *alert = [[UIAlertView alloc] initWithTitle:@"Error"
  message:@"Unable to save image to Photo Album."
 delegate:self cancelButtonTitle:@"Ok"
otherButtonTitles:nil];

[alert show];
[alert release];

}
else{
// All is well

//Take an ImageView and set capturing image on that.
self.imgView.image=image;


    //create the file path to store our PDF document (will be created inside our app's documents directory)
    //If you're using the simulator, the file can be found in: homeFolder/Library/Application Support/iPhone Simulator/versionOfIOS_Simulator/Applications/SomeWeirdStringIdentifyingYourApp/Documents/
 
    NSString *fileName = @"YOUR_PDF_NAME.pdf";
    NSArray *paths = NSSearchPathForDirectoriesInDomains(NSDocumentDirectory, NSUserDomainMask, YES);
NSString *saveDirectory = [paths objectAtIndex:0];
NSString *saveFileName = fileName;
//This String used for Saving a Path on which capturing image to be stored.
self.imagePathString = [saveDirectory stringByAppendingPathComponent:saveFileName];
    NSLog(@"%@",self.imagePathString);

}


}


-(IBAction) emailToSomeElse : (id) sender{

[self showPicker];
}

-(void)showPicker
{

Class mailClass = (NSClassFromString(@"MFMailComposeViewController"));
if (mailClass != nil)
{
// We must always check whether the current device is configured for sending emails
if ([mailClass canSendMail])
{
[self displayComposerSheet];
}
else
{
[self launchMailAppOnDevice];
}
}

}


#pragma mark -
#pragma mark Compose Mail

// Displays an email composition interface inside the application. Populates all the Mail fields.
-(void)displayComposerSheet
{
MFMailComposeViewController *picker = [[MFMailComposeViewController alloc] init];
picker.mailComposeDelegate = self;

[picker setSubject:@"SUBJECT"];


// Set up recipients
NSArray *toRecipients = [NSArray arrayWithObject:@"TO_EMAIL_ADDRESS"];

NSArray *ccRecipients = [[NSArray alloc] init];
NSArray *bccRecipients = [[NSArray alloc] init];

[picker setToRecipients:toRecipients];
[picker setCcRecipients:ccRecipients];
[picker setBccRecipients:bccRecipients];

/*// Attach an image to the email
NSString *path = [[NSBundle mainBundle] pathForResource:@"IMAGE_NAME" ofType:@"png"];
NSData *myData = [NSData dataWithContentsOfFile:path];
[picker addAttachmentData:myData mimeType:@"image/png" fileName:@"IMAGE_NAME"];
*/

//PDF_ATTACHMENT
//Take ImageView on View and on UIGraphicsBeginPDFContextToData(passing imageview bounds i.e capturing photo on imageview) and renderInContext method using Quartz framework

NSMutableData *pdfData = [NSMutableData data];
UIGraphicsBeginPDFContextToData(pdfData,self.imgView.bounds, nil);
UIGraphicsBeginPDFPage();

[self.imgView.layer renderInContext:UIGraphicsGetCurrentContext()];

UIGraphicsEndPDFContext();


[picker addAttachmentData:pdfData mimeType:@"pdf" fileName:@"YOUR_PDF_NAME.pdf"];


// Fill out the email body text
NSString *emailBody = @"Cool!";
[picker setMessageBody:emailBody isHTML:YES];

[self presentModalViewController:picker animated:YES];
    [picker release];
}


// Dismisses the email composition interface when users tap Cancel or Send. Proceeds to update the message field with the result of the operation.
- (void)mailComposeController:(MFMailComposeViewController*)controller didFinishWithResult:(MFMailComposeResult)result error:(NSError*)error
{
//Image View asssign nil after email send successsfully.
self.imgView.image=nil;
//message.hidden = NO;  // Useless

// Notifies users about errors associated with the interface
switch (result)
{
case MFMailComposeResultCancelled:{
//message.text = @"Result: cancelled";
NSString *str =@"Your mail has been cancelled.Try Again!";
UIAlertView *alert = [[UIAlertView alloc] initWithTitle:@"Mail Cancel" message:str delegate:nil cancelButtonTitle:nil otherButtonTitles:@"OK",nil];
[alert show];
[alert release];
break;
}
case MFMailComposeResultSaved:{
//message.text = @"Result: saved";
NSString *str =@"Your Mail has been saved";
UIAlertView *alert = [[UIAlertView alloc] initWithTitle:@"Mail Saved" message:str delegate:nil cancelButtonTitle:nil otherButtonTitles:@"OK",nil];
[alert show];
[alert release];
break;
}
case MFMailComposeResultSent:{
//message.text = @"Result: sent";
NSString *str =@"Your mail has been sent successfully.Thanks!";
UIAlertView *alert = [[UIAlertView alloc] initWithTitle:@"Mail Sent" message:str delegate:nil cancelButtonTitle:nil otherButtonTitles:@"OK",nil];
[alert show];
[alert release];
break;
}
case MFMailComposeResultFailed:{
//message.text = @"Result: failed";
NSString *str =@"Your mail hase been failed.Try Again!";
UIAlertView *alert = [[UIAlertView alloc] initWithTitle:@"Mail Failed" message:str delegate:nil cancelButtonTitle:nil otherButtonTitles:@"OK",nil];
[alert show];
[alert release];
break;
}
default:{
//message.text = @"Result: not sent";
NSString *str =@"Your Mail has not been sent";
UIAlertView *alert = [[UIAlertView alloc] initWithTitle:@"Mail Not Sent" message:str delegate:nil cancelButtonTitle:nil otherButtonTitles:@"OK",nil];
[alert show];
[alert release];
break;
}
}
[self dismissModalViewControllerAnimated:YES];
}


#pragma mark -
#pragma mark Workaround

// Launches the Mail application on the device.
-(void)launchMailAppOnDevice
{
NSString *recipients = @"mailto:&subject=";

// FOR TESTING
//NSString *recipients = @"mailto:@""&subject=";
NSString *body = @"&body=";

NSString *email1 = [NSString stringWithFormat:@"%@%@", recipients, body];
email1 = [email1 stringByAddingPercentEscapesUsingEncoding:NSUTF8StringEncoding];

[[UIApplication sharedApplication] openURL:[NSURL URLWithString:email1]];
}

Wednesday, 14 December 2011

Touch/Tap Event on single Object in iPhone | Populate Custom MenuItems


#pragma mark TouchEvents
-(void) touchesBegan : (NSSet *)touches withEvent : (UIEvent *)event {

UITouch *touch = [[event allTouches]anyObject];

CGPoint touchLocation = [touch locationInView:self.view];
CGPoint origin = self.yourImgView.frame.origin;
CGFloat x2 = origin.x + self.yourImgView.frame.size.width;
CGFloat y2 = origin.y + self.yourImgView.frame.size.height;

/**
Touch Event only responds on Your ImageView
*/

if ((touchLocation.x >= origin.x && touchLocation.x <= x2) && (touchLocation.y >= origin.y && touchLocation.y <= y2))
    {

if ([touch tapCount] == 2) {

[self becomeFirstResponder];

/** Description
 * Create Custom UIMenu Item
 * If we want more Menuitems.So, we can take an array and selector on each items
 * setTargetRect : On which frame you want to tap and display menu item on it.
 * setMenuVisible: No Menu items to hide.
 * menuRect : Where you want to display menu items.
 */

UIMenuItem *menuPasteItem = [[UIMenuItem alloc] initWithTitle:@"Paste" action:@selector(YourMethodName1)];
UIMenuItem *menuCopyItem = [[UIMenuItem alloc] initWithTitle:@"Copy" action:@selector(YourMethodName2)];

UIMenuController *menuController = [UIMenuController sharedMenuController];

CGRect menuRect = CGRectMake(0,10,150,100);

[menuController setTargetRect:menuRect inView:self.yourImgView];
menuController.menuItems=[NSArray arrayWithObjects:menuPasteItem,menuCopyItem,nil];
[menuController setMenuVisible:YES animated:YES];

}


    }

}

#pragma mark BOOL operations

-(BOOL) canBecomeFirstResponder{

return YES;
}

-(BOOL) canPerformAction:(SEL)action withSender:(id)sender{

BOOL confirm = NO;

if (action == @selector(YourMethodName1))
confirm = YES;
if (action == @selector(YourMethodName2))
confirm = YES;

return confirm;

}


I love to write this post, it really helps for me.

Hope

Friday, 9 December 2011

Login failed for user ‘IIS APPPOOL\DefaultAppPool’

Cannot open database “<Database Name>” requested by the login. The login failed.

Steps:
1)Open IIS server & Go to  Application Pools.
2)Select Application Pools & Go to DefaultApppool(on right-side-pane).
3)Right click on DefaultApppool and choose Advance Settings.
4)Go to Process Model section and click on Identity row.
5)Select Built-in-account (i.e radio button is checked).
6)Choose LocalSystem and press Ok.
7) Restart your machine.

Attached image tells How to do settings.


Thursday, 8 December 2011

WCF service call from iPhone

POST_PARAMETERS_IN_WCF_BASED_SERVICE

1) CODE_IN_.NET

METHOD_SIGNATURE

[OperationContract]
[WebInvoke( Method="POST",

RequestFormat = WebMessageFormat.Json,
ResponseFormat = WebMessageFormat.Json)
]


2) CODE_IN_OBJECTIVEC

TERMS_USED

kDevBaseURI="YOUR_REQUEST_PATH_URL"

-(NSString *) postRequest : (NSString *)requestMethod andRequestData : (NSMutableDictionary *) requestData{

NSString *requestString = [[NSString alloc] initWithFormat:@"%@/%@",kDevBaseURI,requestMethod];

NSLog(@"Request:%@",requestString);

NSURL *url=[NSURL URLWithString:requestString];
NSMutableURLRequest *request = [NSMutableURLRequest requestWithURL:url];

//IN_CASE_BACKEND_ACCEPTS_AS
//_REQUESTFORMAT_IS_JSON_FORMAT

NSString *postString = [NSString stringWithFormat:@"{\"name\":\"%@\",\"email\":\"%@\",\"password\":\"%@\"}",@"YOUR_NAME",@"YOUR_EMAIL_ID",@"YOUR_PASSWORD"];

//OTHERWISE
//NO_REQUEST_FORMAT

NSMutableDictionary *jsonDict = [[NSMutableDictionary alloc] init];

[jsonDict setObject:@"YOUR_NAME" forKey:@"name"];

[jsonDict setObject:@"YOUR_EMAIL_ID" forKey:@"email"];

[jsonDict setObject:@"YOUR_PASSWORD" forKey:@"password"];

NSString *postString = [requestData JSONRepresentation];
NSLog(@"POST_STRING:%@",postString);

//

NSData *postBody = [postString dataUsingEncoding:NSUTF8StringEncoding];
NSString *contentType = @"application/json; charset=utf-8";
[request addValue:contentType forHTTPHeaderField:@"Content-Type"];

unsigned long long postLength = postBody.length;

NSString *contentLength = [NSString stringWithFormat:@"%llu",postLength];
[request addValue:contentLength forHTTPHeaderField:@"Content-Length"];

[request setHTTPMethod:@"POST"];
[request setHTTPBody:postBody];


NSError *error;
NSURLResponse *response;
NSData *webresponse = [[NSData data] retain];

webresponse = [NSURLConnection sendSynchronousRequest:request returningResponse:&response error:&error];
NSString *strJSON = [[NSString alloc]initWithBytes: [webresponse bytes]
length:[webresponse length] encoding:NSUTF8StringEncoding];


NSLog(@" here is web data : %@",strJSON);

return strJSON;

}


GET_PARAMETERS_IN_WCF_BASED

-(void) getRequest {

   NSString *requestString = [[NSString alloc] initWithFormat:@"%@/check?a=%@",kDevBaseURI,@"ABC"];
NSLog(@"Request check :%@",requestString);

NSString *responseString = [self stringWithUrl:[NSURL URLWithString:requestString]];
NSLog(@"Response :%@",responseString);

}

THIS_GENERIC_FUNCTION_USED_IN_BOTH_REQUEST(POST || GET)

- (NSString *)stringWithUrl:(NSURL *)url
{
NSURLRequest *urlRequest = [NSURLRequest requestWithURL:url cachePolicy:NSURLRequestReloadIgnoringLocalCacheData timeoutInterval:30];
    // Fetch the JSON response
NSData *urlData;
NSURLResponse *response;
NSError *error;
    NSString *result;
 
// Make synchronous request
urlData = [NSURLConnection sendSynchronousRequest:urlRequest
                                    returningResponse:&response
                                                error:&error];
 
  // Construct a String around the Data from the response
result = [[[NSString alloc] initWithData:urlData encoding:NSUTF8StringEncoding] autorelease];
 
    //NSLog(@"stringWithUrl urlRequest: %@ result: %@ response: %@ error: %@",urlRequest,result,response,error);
 
    return result;
}


Wednesday, 12 October 2011

Header & Footer View on UITableview


Header and Footer on tableview.
( Less Overhead on UItableviewCell )


-(void) viewDidLoad {
//Calling this on viewdidload Nothing to do on CellForRowAtIndexPath

self.tableView.tableHeaderView = [self headerView];
self.tableView.tableHeaderView = [self footerView];
}


//Header

-(UIView *) headerView{

UIView *customView=[[UIView alloc]initWithFrame:CGRectMake(10,3,290,40)];
UILabel *lblUnlistedStore = [[UILabel alloc] initWithFrame:CGRectMake(16,3,290,35)];
lblUnlistedStore.backgroundColor = [UIColor clearColor];
lblUnlistedStore.font=[UIFont boldSystemFontOfSize:14.0];
lblUnlistedStore.lineBreakMode=UILineBreakModeWordWrap;
lblUnlistedStore.numberOfLines=3;
lblUnlistedStore.textColor=kBlueColor;
lblUnlistedStore.text=@"YOUR_TEXT";
[customView addSubview:lblUnlistedStore];
return customView;


}

//Footer
-(UIView *) footerView{
UIView *customView=[[UIView alloc]initWithFrame:CGRectMake(5,3,290,120)];
UIButton *btnStorePhone = [UIButton buttonWithType:UIButtonTypeRoundedRect];
btnStorePhone.frame = CGRectMake(5,3,140,35);
[btnStorePhone setTitle:@"7838657511" forState:UIControlStateNormal];
btnStorePhone.titleLabel.textColor = [UIColor bluecolor];
[btnStorePhone addTarget:self action:@selector(yourMethod:) forControlEvents:UIControlEventTouchUpInside];
[customView addSubview:btnStorePhone];

UIButton *btnStoreWebsiteURL = [UIButton buttonWithType:UIButtonTypeRoundedRect];
btnStoreWebsiteURL.frame = CGRectMake(160,3,140,35);
btnStoreWebsiteURL.titleLabel.textColor = [UIColor bluecolor];
[btnStoreWebsiteURL setTitle:@"Visit Website" forState:UIControlStateNormal];
[btnStoreWebsiteURL addTarget:self action:@selector(yourMethod:) forControlEvents:UIControlEventTouchUpInside];

[customView addSubview:btnStoreWebsiteURL];

UILabel *lblStoreHours = [[UILabel alloc] initWithFrame:CGRectMake(10,50,290,60)];
lblStoreHours.layer.cornerRadius=10.0; // this is for styling your label i.e. to give oval shape to your label.It needs Quartz core framework to be included. 
lblStoreHours.layer.masksToBounds=YES;


lblStoreHours.font=[UIFont systemFontOfSize:14.0];
lblStoreHours.lineBreakMode=UILineBreakModeWordWrap;
lblStoreHours.numberOfLines=3;

lblStoreHours.text=@"YOUR_TEXT";

[customView addSubview:lblStoreHours];
return customView;


}

Cheers :)

Monday, 8 August 2011

IMAGE ( BASE-64 STRING ) POST URL IN OBJECTIVE C


Steps:

1.Add Cryptor library for encryption/decryption
2.UIImageView * imageView;

/*--------------------------------------Code Starts here-------------------------- -------------*/
     Cryptor *crypt = [[Cryptor alloc] init];
    NSData *imgData =[[NSData alloc]initWithData:UIImagePNGRepresentation(self.imageView.image)];
    NSString *imageString = (NSString *)[crypt base64Encoding:imgData];
    
    
    //Your WebMethod =>
*webMethodname 
*inputParameters -> Method expects parameter.
 *kURI-> Path where you call webservices .

    NSString *stringURI= [NSString stringWithFormat:@"%@?method=WBMETHODNAME & inputParameters=%@,kURI,inputfields];
    stringURI = [stringURI stringByReplacingOccurrencesOfString:@" " withString:@"%20"];
    

    NSURL *url=[NSURL URLWithString:stringURI];
    NSMutableURLRequest *request = [NSMutableURLRequest requestWithURL:url];
    
    NSString *postString = [NSString stringWithFormat:@"image=%@",[self encodeString:imageString]];
    
    NSData *postBody = [postString dataUsingEncoding:NSUTF8StringEncoding];
    
    NSString *contentType = @"application/x-www-form-urlencoded; charset=utf-8";
    [request addValue:contentType forHTTPHeaderField:@"Content-Type"];
    
    unsigned long long postLength = postBody.length;
    
    NSString *contentLength = [NSString stringWithFormat:@"%llu",postLength];
    [request addValue:contentLength forHTTPHeaderField:@"Content-Length"];
    
    [request setHTTPMethod:@"POST"];
    [request setHTTPBody:postBody];
    
    NSError *error;
    NSURLResponse *response;
    NSData *webresponse = [[NSData data] retain];
    
    webresponse = [NSURLConnection sendSynchronousRequest:request returningResponse:&response error:&error];
    NSString *strXML = [[NSString alloc]initWithBytes: [webresponse bytes]
                                               length:[webresponse length] encoding:NSUTF8StringEncoding];
    NSLog(@"RESPONSE  here is web data : %@",strXML);
    
}

- (NSString *)encodeString:(NSString *)string {
    
    NSString *newString = NSMakeCollectable([(NSString *)CFURLCreateStringByAddingPercentEscapes(kCFAllocatorDefault, (CFStringRef)string, NULL, CFSTR(":/?#[]@!$ &'()*+,;=\"<>%{}|\\^~`"), CFStringConvertNSStringEncodingToEncoding(NSUTF8StringEncoding)) autorelease]);
    
    return newString;
    
}

Thursday, 30 June 2011

Converting audio file format on MacOSX

For uncompressed (highest quality) audio, use 16-bit, little endian, linear PCM audio data packaged in a CAF file. You can convert an audio file to this format in Mac OS X using the afconvert command-line tool


Code:
/usr/bin/afconvert -f caff -d LEI16 {INPUT} {OUTPUT}

where,
Input : path which you want to convert.
Output: path which you want to save.

Example :


localhost:~ ashishjabble$ /usr/bin/afconvert -f caff -d LEI16 /Users/ashishjabble/Desktop/sounds/Snore_Whistle.mp3  /Users/ashishjabble/Desktop/sounds/caf/Snore-Whistle.caf


* Generally users open a audio file and then right click on that and change the extension of format which they want  it works on MACOSX, but when we use this audio format into our Xcode project Resource Folder ,which we play custom sound for APPLE PUSH NOTIFICATION   but it doesnot work.So, use above command for converting audio format and it works perfect.


Enjoy :))